


You will need:
2 peices of tan felt- about a 6 inch square
1 peice of brown felt (for syrup)
1 peice of cream felt (for butter pat)
poly fil or filling of your choice
Coordinating thread
Sewing machine (or you can hand sew using a blanket stitch)
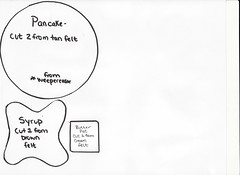 Print the template. Here is the link to the pdf file for the felt food pancake template.
 Step 1:Sew the butter pat onto the syrup peice.You can add a little bit of poly fil into the butter pat if you wish.
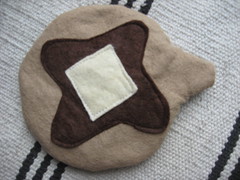
Step 2: Sew the syrup onto the middle of pancake peice.
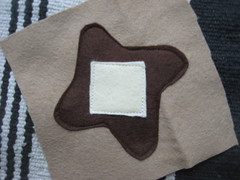 Butter pat and syrup sewn onto the center of the pancake peice.
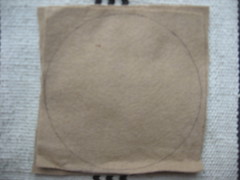 Step 3: Lay your back pancake peice down(with no syrup on it) and place the top syrup pancake peice on top. The syrup and butter pat should face wrong side out,with the syrup and butter in the inside. Trace your pancake template onto the tan felt.
 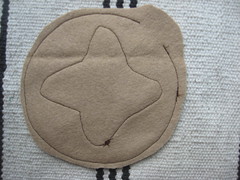 Step 4:Sew along your outlined circle, leaving a 1 inch or so gap for turning, Backstitch at beginning and end.Trim excess felt, but leave extra around the turning hole, this will make it easier to handstitched closed becasue you will have more felt to hold onto.
 Step 5: Turn the pancake right side out through the turning hole.Take care not to pull and stretch your felt too much.
 Step 6: This is what your pancake will look like after you have turned it right side out and before it is stuffed.
 Step 7:Fill your pancake with poly-fil and be very generous! You want it to be nice and firmly packed. Push as much of the poly fil away from the seam as you can before you start to stitch the seam closed.
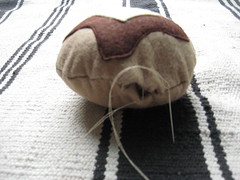 Step 8: Whip stitch your opening closed. I usually stitch along the seam twice, once to get it closed, the second time for durability.If you seam look very straight when you are finished, simply squish the poly fil around in the pancake to help fill out the edge of your seam.
 Step 9: Your finished! Now make another pancake and some eggs to complete a breakfast set!
Butter pat and syrup sewn onto the center of the pancake peice.Step 3: Lay your back pancake peice down(with no syrup on it) and place the top syrup pancake peice on top. The syrup and butter pat should face wrong side out,with the syrup and butter in the inside. Trace your pancake template onto the tan felt. Step 4:Sew along your outlined circle, leaving a 1 inch or so gap for turning, Backstitch at beginning and end.Trim excess felt, but leave extra around the turning hole, this will make it easier to handstitched closed becasue you will have more felt to hold onto.Step 5: Turn the pancake right side out through the turning hole.Take care not to pull and stretch your felt too much.Step 6: This is what your pancake will look like after you have turned it right side out and before it is stuffed.Step 7:Fill your pancake with poly-fil and be very generous! You want it to be nice and firmly packed. Push as much of the poly fil away from the seam as you can before you start to stitch the seam closed.Step 8: Whip stitch your opening closed. I usually stitch along the seam twice, once to get it closed, the second time for durability.If you seam look very straight when you are finished, simply squish the poly fil around in the pancake to help fill out the edge of your seam.Step 9: Your finished! Now make another pancake and some eggs to complete a breakfast set!(Anyone want an egg tutorial? Something else -a veggie or fruit that they would love to make? Let me know and it can be my next tute!)
Again, let me know if anything wasnt clear. And if you make one, I would love to see a picture!


3 comments:
So cute!
Thanks for the tutorial! very original!
This is the right weblog for anyone who desires to find out about this topic. You notice so much its almost hard to argue with you (not that I actually would want…HaHa). You undoubtedly put a new spin on a topic thats been written about for years. Great stuff, simply great! casino bonus
Post a Comment